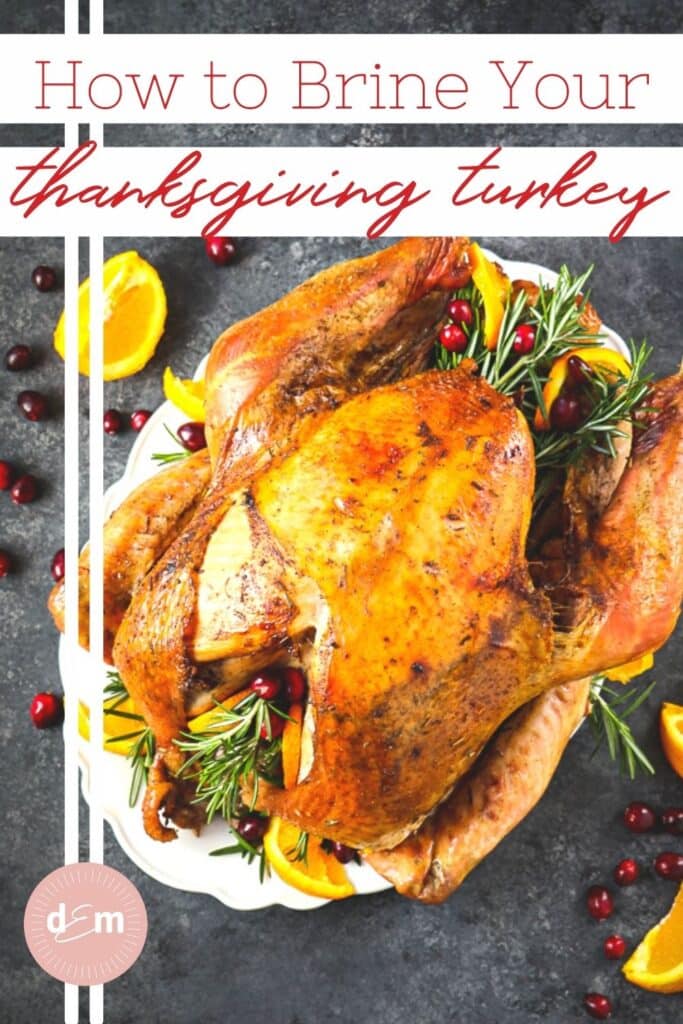
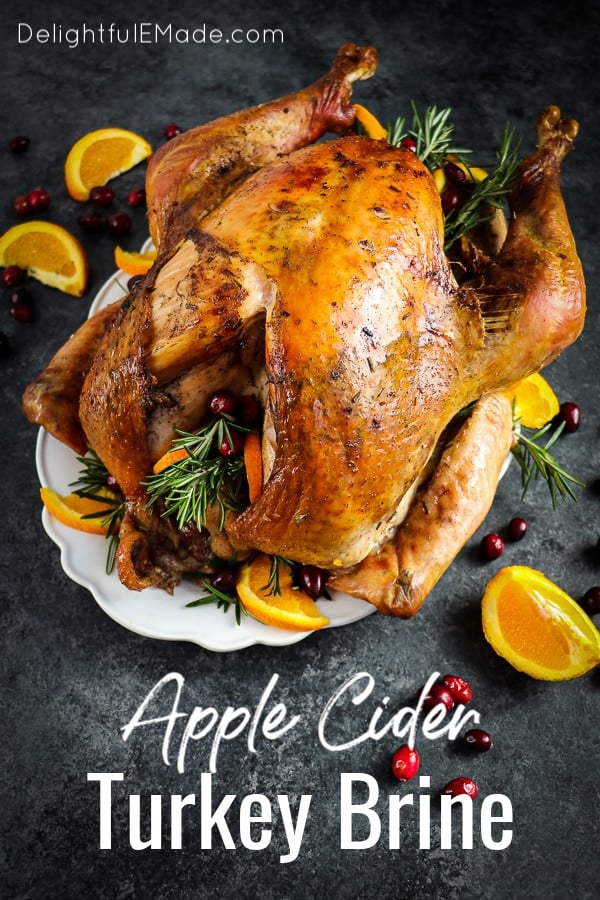
This Apple Cider Turkey Brine is the BEST Turkey Brine Recipe!
Want to know how to brine a turkey? This Apple Cider Turkey Brine recipe is the key to roasting the most amazing Thanksgiving bird! Made with apple cider, brown sugar, spices and herbs, this turkey brine recipe will be your new go-to for every holiday meal!
This Apple Cider Turkey Brine is the BEST Turkey Brine Recipe!
Over the past decade, I’m sure I’ve roasted a dozen turkeys, if not more. I’ve come to the conclusion that a good turkey brine recipe is the absolute best way to add flavor, juiciness and take your bird from good to amazing!
This recipe for Apple Cider Turkey Brine is my go-to recipe for making the most amazing Thanksgiving and Christmas turkey!
Here’s how this simple, easy-to-make turkey brine recipe comes together:
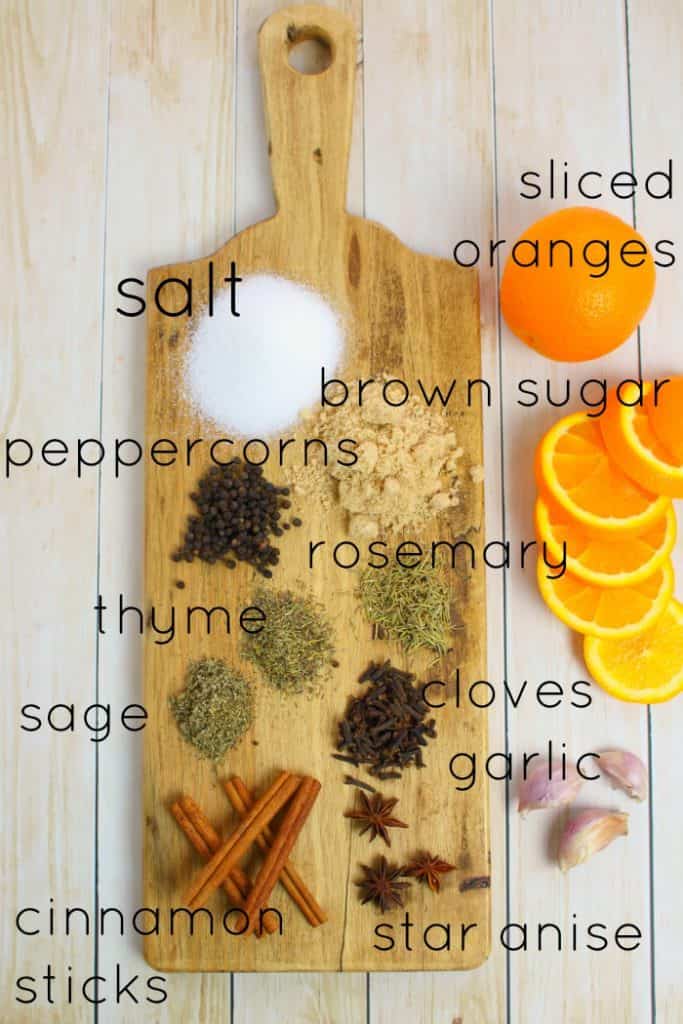
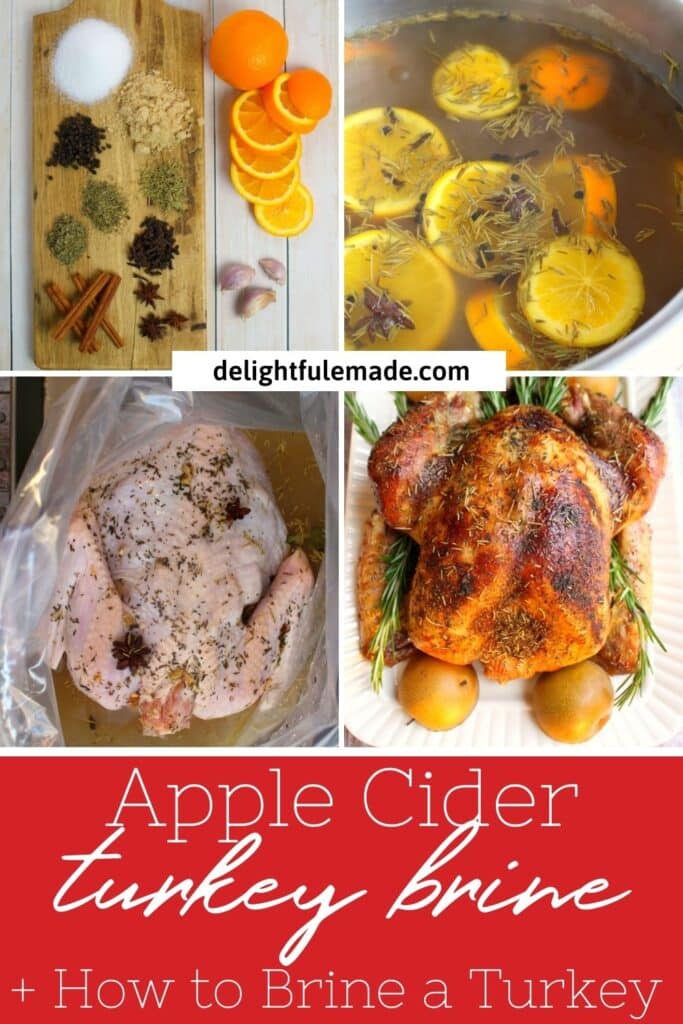
Step 1: Gather all of your ingredients for the Apple Cider Turkey Brine
Making a brine for your turkey is a relatively simple process. The main ingredients are salt and water, but beyond that, you can really customize the seasoning and spices to your tastes.
The salt acts as a tenderizer for the meat, and the spices and seasoning add some really great flavor, without being overpowering. A few years back, I began substituting part of the water with Apple Cider, and haven’t gone back. The results were incredible!
After quite a bit of trial, error and substitution over the years, I’ve come up with this brine recipe that has been my go-to recipe for many holiday meals. The results with this Apple Cider Turkey Brine recipe are not only spot-on with flavor, it’s now the only way I make a holiday turkey!
Here are the ingredients and a few other essentials for your Turkey Brine Recipe:
Here’s a quick-reference ingredient list of the items you’ll need to make this delicious turkey brine recipe. I’ve linked some of my preferred ingredients from Target (affiliate links), where you can do a quick same-day grocery pick-up should you need something at the last minute.
- Salt – the best option is Kosher salt. Table salt can certainly be used, however, some say that table salt leaves a bit of a metallic taste.
- Brown Sugar – brown sugar will provide a nice sweetness and contract to the savory salt brine. You can use either light or dark brown sugar.
- Peppercorns – Whole peppercorns will provide a great peppery spice flavor to the brine.
- Rosemary – I love using fresh rosemary sprigs in this brine recipe, as it is wonderfully flavorful and aromatic. If you cannot find fresh, you are welcome to use dry rosemary.
- Thyme – you can use either dried Thyme leaves or add in a few sprigs of fresh thyme.
- Sage – ground dried sage is another spice that is great for poultry and adds wonderful flavor to this brine. You can also use fresh sage leaves.
- Whole Cloves – the whole cloves will add amazing flavor to the brine. A little bit goes a long way, so if you prefer a more mild, less spiced flavor, cut the amount of cloves in half or leave out completely.
- Star Anise – a few star anise added to the brine will bring a unique and delicious flavor profile. Like the cloves, a little goes a long way.
- Cinnamon Sticks – whole cinnamon sticks will add a fantastic flavor profile to the brine.
- Garlic – a few garlic cloves that have been roughly chopped will bring in a great flavor to the brine.
- Oranges – a couple of fresh oranges sliced thickly will bring in a great citrus flavor.
- Apple Cider – the cornerstone ingredient in this brine is apple cider which adds amazing flavor and richness to the meat of the turkey. If you cannot find apple cider, feel free to substitute with apple juice. Note – DONT use apple cider vinegar. Apple cider and apple cider vinegar are NOT interchangeable.
Tools needed to brine a turkey:
- Brining Bag (not oven bag) – an essential tool for brining a turkey is a brining bag. I don’t recommend using a plastic oven bag, as this is NOT the same product. A brining bag is made out of a thick plastic that can withhold the weight of the turkey and a large amount of liquid. An oven bag is designed for roasting only, and is made of much thinner plastic.
- Stock Pot or Dutch Oven – you’ll need a large stock pot or Dutch oven to simmer the brine.
For exact recipe amounts of each ingredient, be sure to scroll down to the bottom of this post to the recipe card. Thanks!
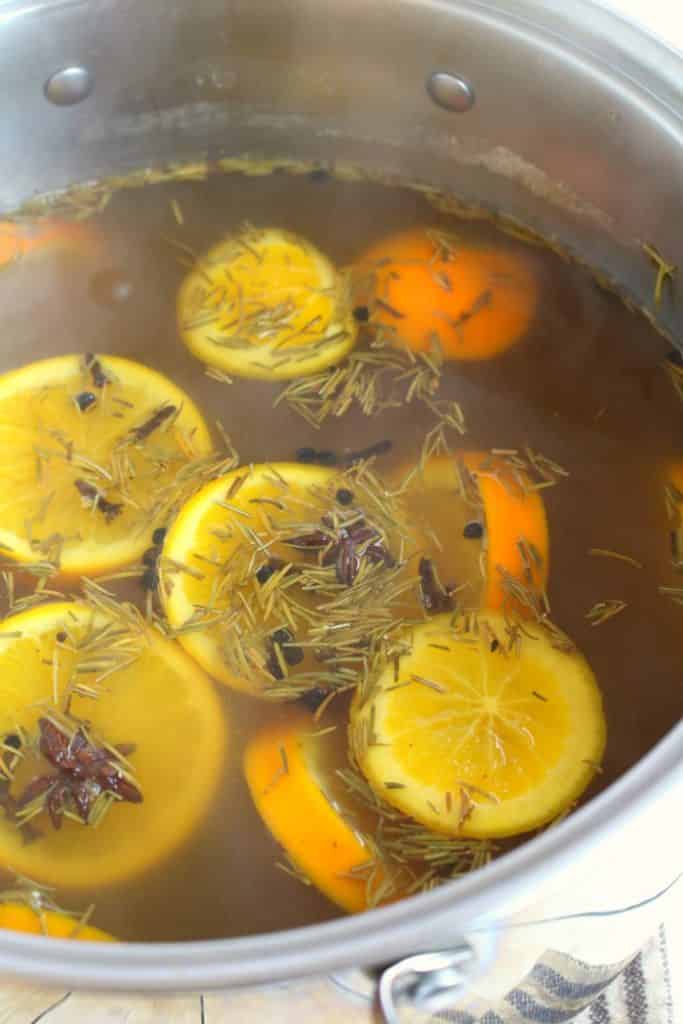
Step 2: Combine all ingredients in a stock pot and bring to a boil
When making this Apple Cider Turkey Brine, you’ll need a large stock pot or Dutch Oven to bring the salt, spices and liquid to a boil. In addition to a gallon of water, I’ve also added a half gallon of apple cider.
With the oranges, cinnamon and cloves, this brine smells absolutely amazing when coming to a simmer. You’ll want to stir the brine mixture often while it comes to a boil, as the salt and sugar need to dissolve in the liquid.
Once the liquid comes to a rolling boil, remove the brine from the heat, and cover with a lid. Let the brine cool and come to room temperature. (I let mine sit and cool for at least an hour.) Never pour a hot brine over a thawed, uncooked turkey.
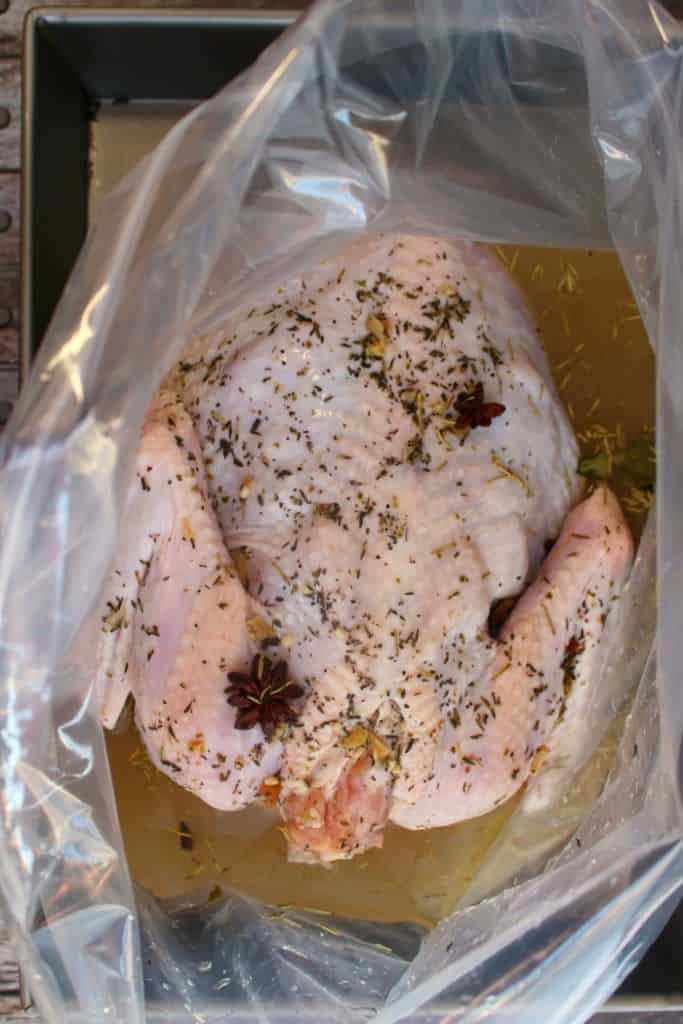
Step 3: Pour the Cooled Brine Over the Turkey into a Brining Bag
Once the liquid has come to room temperature, you can then the Apple Cider Turkey Brine onto the turkey. Your turkey should be mostly thawed by this point, but it’s okay if there are still ice crystals on the inside of the bird.
Speaking of the inside of the bird, be sure to remove the bag of giblets that have been placed inside the turkey. These are not necessary to the brining process. The giblets typically include the neck, liver, heart, and gizzard of the turkey. Some like to include the giblet meat with their stuffing, or roast alongside the turkey – I personally discard these parts, as no one in my house eats them.
The brining bag
Okay, so back to the brining bag….I don’t recommend using a bucket or cooler to brine your turkey, although you can use it if you’re in a pinch. Brining bags are specifically designed for this exact technique. Unlike an oven bag (DONT use an oven bag – it’s not thick enough and you’ll surely spring a leak!) the plastic is much thicker, and can withstand the weight of the liquid and the turkey.
Place your turkey breast-side down, and pour the brine over the top of the bird. If you have a very large turkey, like 18-22 lbs, add an extra 1/2 to 1 gallon of additional water.
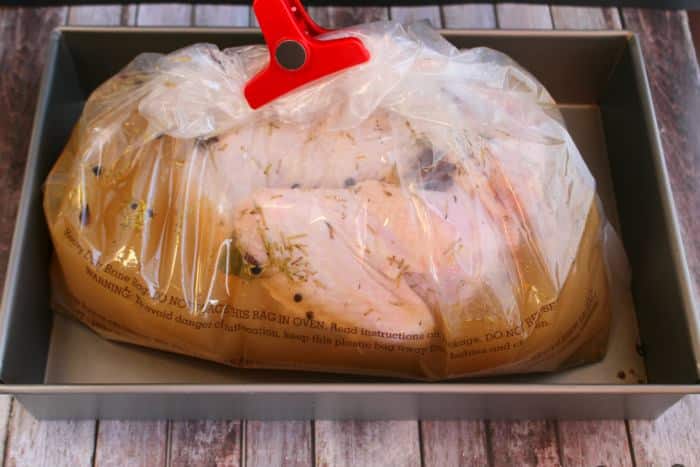
Step 4: Seal and Refrigerate the Turkey Brine Recipe
Once everything is in the bag, close up the bag tightly, and refrigerate the brined turkey for 18-24 hours. The brining bag will typically have a zip-lock type of closure, but in addition to that, I’ll roll up the bag and secure with a clip. (A good chip-clip or large binder clips are an awesome solution here!)
I will also place the bagged turkey inside a large roasting pan. This is just to make sure that if the bag happens to spring a leak (I’ve never had this happen, but its possible) that the liquid is contained and doesn’t flood my refrigerator.
If you are really tight on refrigerator space, you can place the bagged turkey in a large cooler, and cover with ice. Just be sure to keep the turkey cold and well iced for the 18-24 hours. You may need to drain off some water and extra ice halfway through the process.
Frequently Asked Questions about Brining A Turkey:
Yes, your turkey will be okay if it sits in the brine for longer than 24 hours. However, I would not recommend any more than 36 hours. The salt in the brine will begin to break down the protein fibers of the meat, and the texture of the turkey will not be as good.
No. Apple cider vinegar is very different than apple cider. Your brine will be VERY acidic and will affect the flavor and texture of the meat. If you cannot find apple cider, I would recommend using apple juice or orange juice instead.
The brine amount is appropriate for almost all turkey sizes. The brine liquid will be a good amount for anything from a 10-20 lb turkey. Any larger and you may want to add some extra water.
The drippings shouldn’t be overly salty. Because you have thoroughly rinsed your turkey prior to cooking, any excess salt was removed. However, if you would like to exercise caution, use half drippings, half water or chicken stock for your gravy.
No. These are two very different products. A roasting bag is built to go into the oven and is a much thinner plastic. It is not meant to hold a large amount of liquid and will likely spring a leak, leaving you with liquid brine everywhere! Instead, be sure to purchase a brining bag. This is specifically built for large amounts of liquid and able to withstand the weight of a turkey. It is much thicker plastic and is much more durable.
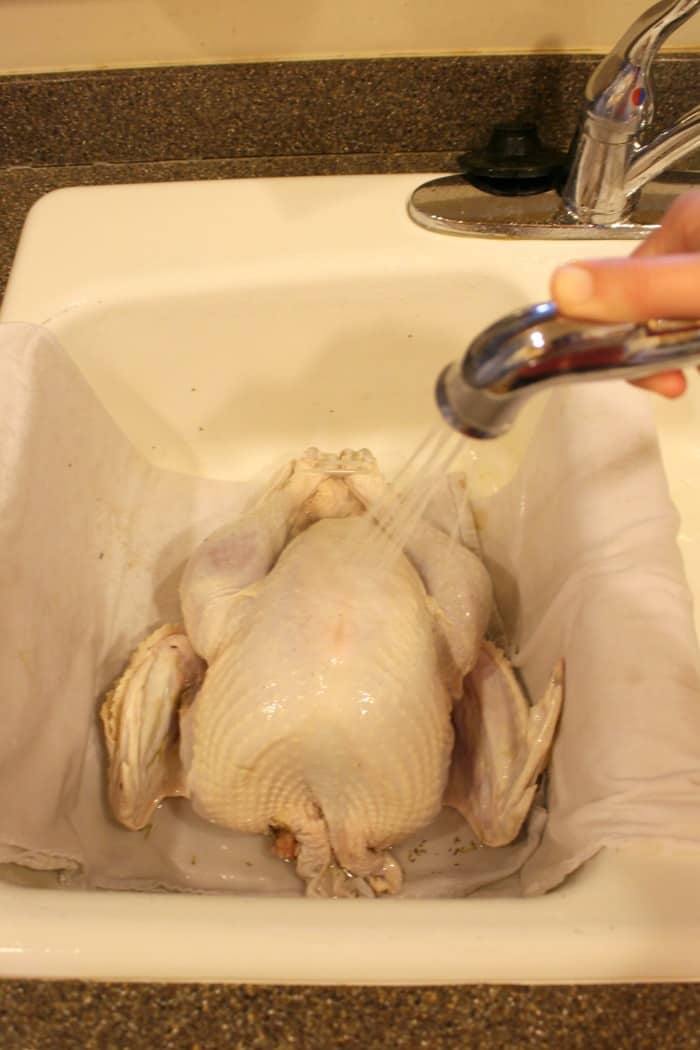
Step 5: Rinse the Turkey before Roasting
Okay, so it is now likely Thanksgiving or Christmas day. Your turkey has been in the refrigerator brining for nearly a day – he’s now ready to come out and make his holiday debut! The last step of brining your turkey is to give him a good rinse before roasting.
After nearly dropping my turkey on more than one occasion, I’ve discovered through much trial and error this easy technique. First, start with a CLEAN kitchen sink. Lay down some clean kitchen towels so the turkey doesn’t slip around.
Next, with the water sprayer or faucet, give the turkey a really good rinsing. Be sure to rinse inside the inner cavity, and all around the wings and legs. This will remove any excess salt and herbs, on the outer surface and prevent the turkey from being overly salty.
Don’t worry, you’re not undoing or diluting the brine that you just did – the salt, herbs, and all the other ingredients from the brine have already permeated the meat and have adequately done their job.
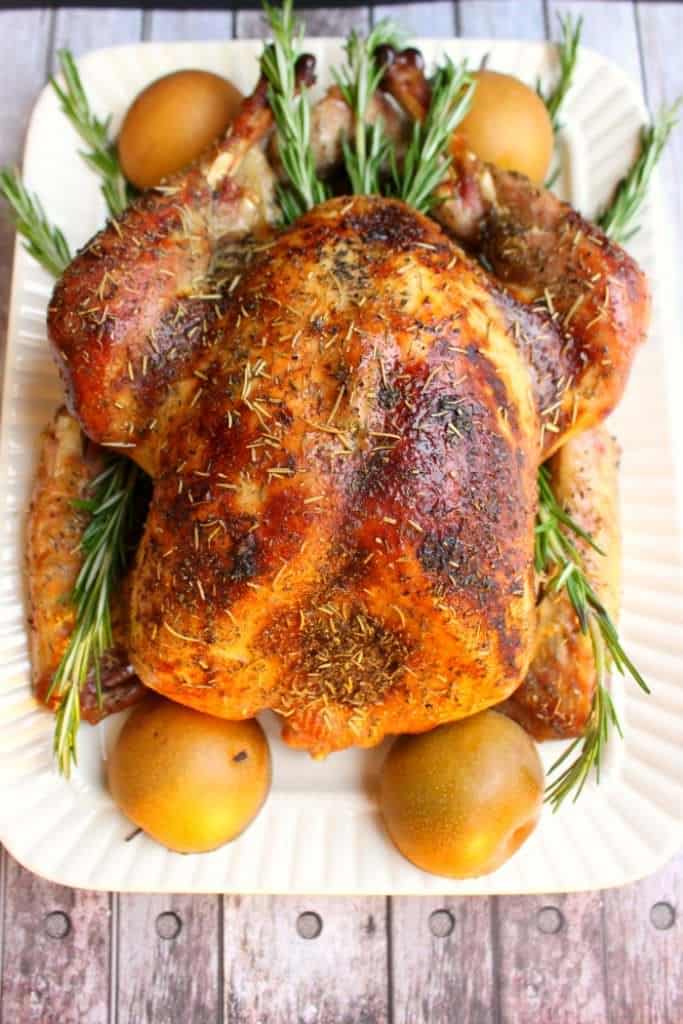
That’s it. You’re now done brining your turkey – he’s all set and ready to be roasted to perfection! Wanna know how to roast your turkey? Check out my post for 3 EASY TIPS FOR A MOIST AND DELICIOUS TURKEY here. I cover how to prep your turkey for roasting, and how to get that really awesome golden, brown skin.
If ham is more your thing, make sure you check out my recipe for How to Cook a Costco Spiral Ham with an Orange Honey Glaze. It’s crazy eazy – just 5 minutes of prep – and it looks gorgeous!
From my family to yours, I wish you a blessed, happy and healthy holiday season!
Here are a few other holiday recipes that are perfect for your Thanksgiving and Christmas dinner table:
- Hasselback Sweet Potatoes
- Boursin Mashed Potatoes
- Honey Balsamic Brussels Sprouts
- Sweet Potato Casserole with Marshmallows and Pecans
- Creamed Corn Casserole
- Ruth Chris Sweet Potato Casserole
- Cranberry Fluff Salad
- Healthy Green Bean Casserole
- Slow Cooker Turkey Breast
- Everything Thanksgiving Stuffing
- Parmesan Mashed Potatoes
- Cranberry Citrus Salad with Goat Cheese & Pecans
- Roasted Butternut Squash Medley
- Hot Mulled Apple Cider
- Citrus Turkey Brine
- What to Serve with Mashed Potatoes
If you’re looking for How to Dry Brine a Turkey, I’ve got a great tutorial here:

Get the Easy Apple Cider Turkey Brine recipe here:
Want to Save This Recipe?
Enter your email & I’ll send it to your inbox. Plus, get great new recipes from me every week!
By submitting this form, you consent to receive emails from Delightful E Made.
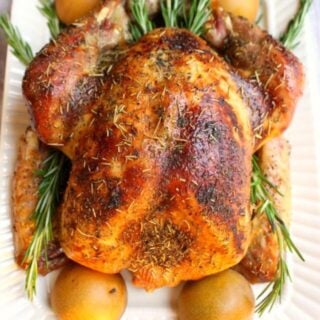
Apple Cider Turkey Brine
Equipment
- Disposable Roasting Pan Using a disposable roasting pan for your turkey is a great way to cut down on clean-up!
- Brining Bag Make sure you have a large turkey brining bag. These bags from Amazon are excellent!!
- Large Stock Pot or Dutch Oven I absolutely LOVE my LeCreuset 9 qt. Dutch oven!
Ingredients
- 1 cup kosher salt
- 1/2 cup brown sugar
- 2 Tablespoons peppercorns
- 2 Tablespoons dried rosemary
- 2 Tablespoons thyme
- 2 Tablespoons ground sage
- 1 Tablespoons whole cloves
- 2-3 star anise
- 3-4 cinnamon sticks
- 3 cloves of garlic minced
- 2 medium oranges sliced
- 2 quarts apple cider or apple juice
- 1 gallon water
Instructions
- To a large stock pot, add all of the ingredients; salt, brown sugar, peppercorns, rosemary, thyme, sage, cloves, anise, cinnamon, garlic, orange slices, apple cider and water. Heat over medium high heat, stirring to dissolve the salt and sugar. Bring to a rolling boil, and then immediately remove from heat. Let brine come to room temperature. (Do NOT add a hot brine immediately to a turkey.)
- Place thawed, uncooked turkey into large brining bag, removing any giblets that may have been in the inner cavity of the turkey. Pour cooled brine over the top of the turkey, including all ingredients that were cooked in the brine.
- Seal the bag, and secure with clips if necessary. Refrigerate the turkey and brine for 18-24 hours.
- Once brining is complete, discard brine and brining bag.
- Place several dish towels in your sink and place the turkey on the towels. Thoroughly rinse the turkey on the inside and outside. Lightly pat with a dry towel and prep for roasting.
Notes
Nutrition
Be sure to check out my post on 3 Easy Steps to a Moist and Delicious Turkey – I have great brining, roasting and prep tips for roasting the ultimate holiday turkey!
Hi made this brine for the first time for friendsgiving. I have made plenty of turkeys however never brined them.
I must say this is my new go to recipe. It was extra work to brine it but well worth it !! I am already planning to make this again.
Thank you so much for sharing your recipe ☺
Awesome!! So glad you loved it. And yes, I feel the same about brining. It is a little more work, but the results are well worth it! Happy Thanksgiving! ~Erin
can you make the brine the day before you need it?
We’re brining our turkey this year – this looks like a great recipe to try! Thanks for sharing at the What’s for Dinner party!
How much wine Can I add and do I add less water if I’m adding wine?
Who said anything about wine?? Sheesh
This recipe looks fabulous! I’m bringing the turkey this year and plan to brine it first. These ingredients sound perfect!
Fantastic! You’ll love it, Joanne!
If I add wine do I not add as much water? Do I not add Apple juice?
Try to keep the amount of liquid the same. For example, if you’re adding 1 qt. of wine, remove 1 qt of water. I haven’t tried the brine with both apple juice AND wine. I would recommend doing one or the other but not both. Good luck and Happy Thanksgiving! ~Erin
Okay thank you, do you know if it’s better with the Apple juice or wine?
For the love of God, what’s up with you and the wine???? 🙂
I want to bribe my turkey this year. I read that you can add wine or beer. What kind and how much? Also could you do oranges, apples, and pears?
Brine not bribe ugggg
This Turkey will be amazing! Wishing you a bountiful Thanksgiving and thanks so much for sharing with us at Full Plate Thursday.
Our Party for this week will start Tuesday Morning at 8:00 am CST.
Hope to see you then!
Miz Helen
What a beautiful looking turkey. I have to try this recipe. I will be featuring this tomorrow night at my Fall into Fall party. Please stop by and pick up an I’ve Been Featured button. Thanks. http://diybydesign.blogspot.com Happy Thanksgiving!
Do you make gravy from the drippings? I’ve read that a brined turkey can make the gravy too salty? I want to brine my turkey this year but I’m scared for this reason! 😳 Thanks!
I’m making the turkey this year and want to know do I use one gallon of water and still 2 quarts of the apple cider?
I’ve experimented in the past with various ways to make turkeys…smoke, BBQ, etc…but never with brine. This will be our first time and I’m looking forward to it, especially after reading the positive feedback on your recipe! Happy Thanksgiving!
Can I make the brine the day before I use it?
Would the turkey still taste good if you served it with gravy?
Does the turkey meat end up having an orange-y flavor? Or sweet flavor from the cider? Or does it simply add moistness? What is the end flavor of the turkey meat?
Can I use Apple cider vinegar? I️ accidentally bought vinegar instead!!
If you want it to taste horrible, sure.
I made this brine for the first time, I can’t wait to dig in! Thank you
We hosted our first thanksgiving for 14 people and used your brining and roasting recipe. It turned out great. The skin color was a bit darker than yours, but it was still a very good looking abs juicy turkey. I wish I could attach a pic in the comment. Thanks so much!
Congratulations!
Your post is featured on The Thanksgiving Edition of Full Plate Thursday! Thanks so much for sharing with us, enjoy your new Red Plate and come back soon!
Miz Helen
I made this for a 27 lb turkey (adding the suggested extra fluid) for our church family thanksgiving dinner. I followed the recipe exactly, using the apple juice instead of cider because that’s what I had. A chef told me it was the best turkey he ever had. EVER. Another person said I “hit it out of the ball park”. Everyone raved. After brining, I used the “Juicy Thanksgiving Turkey” recipe by Kirsten on AllRecipes.com except I used sparkling apple cider instead of the champagne. Then made the gravy using the “Perfect Turkey Gravy” recipe by CenterCutCook on Pinterest using the juices from the brined Turkey. The turkey was moist and delicious. Thank you so much for sharing. Fun and not difficult.
Thank you for sharing your culinary skills! I love this recipe and am featuring this week in 12 Holiday Recipes for Easy Entertaining. Happy Holidays! https://www.happyandblessedhome.com/12-holiday-recipes-entertaining/
Hello! Your recipe sounds wonderful! I was wondering what you do for gravy? I tried brining a turkey last year but then realized the remaining cooking juices that I usually use for gravy were way too salty. Although I can’t remember if I washed the brine off as you suggest….
Would you happen to have any suggestions?
Thanks so much!
Denise
I’m trying the recipe, waiting for it to cool. A little bit nervous lol. I dont have rosemarry and orange so I have replaced with savory and some slices of meyer lemon and orange juice. For now the liquid is a bit salty. I wonder how it should be tasted! The turkey I have is just 3.7kg
I have finished with the boiling but the taste is a just a little bit bitter I asume because of the oranges. Was that suppose to happen ? Do I still use it to brine the turkey ?
Is this an Us or an Imperial measurement.
That sounds delicious! I have never tried brining a turkey but this sure does sound like it would give it lots of added flavor.
Excellent recipe! Thanks for sharing at the What’s for Dinner party!
Hello!! I’m stepping outside of my “turkey comfort zone” this year and tryingthis recipe for Thanksgiving!! I am just wondering if the thyme should be fresh or dried? The rosemary and sage are specific but the thyme isn’t & I want to make sure I do it correctly!!
Thanks!!!
How long can we keep it in the Brine?
Does it have to be for only 24 hours or can it be longer?
Is it ok to brine for longer then 24 hours?
What if I want to make a gravy? Could this work? This is my first time making a turkey but I really want to try this brine! Thank you
Is it fine to brine it longer than 24 hours?
This recipe looks amazing but im struggli g to find star anise,ive tried walmart aldies , hivee. Would anise extract work and iff so how much?!!
I have never made a turkey that came out so full of juices and flavor! Thank you so much. The turkey was perfect because of this brine.
Hi! I made this last year and it was delish.. this year making it again BUT I don’t recall if I used apple cider from the champagne looking bottle.. so instead I bought apple cider vinegar.. is there a difference? Hoping it comes out just as delicious!
what size turkey is this recipe for?
I used this recipe for the first time today. I’m not usually very good at baking turkey, or any other meat for that matter. I’m more of a “side specialist”. I took a chance, and this was incredible. No seasoning other than the brine on this turkey! No gravy..nothing. It was rich in flavor, and damn delicious! Best turkey I’ve ever made, hands down. This will be my “go to” recipe from now on. I used Alton Brown’s method for baking (500 for 30 min, then bake at 250 til it hits 155 degrees). I’m his year the turkey was definitely center stage! It was worth the time, and effort…100%!
I truly appreciate this post. I have been looking everywhere for this! Thank goodness I found it on Bing. You’ve made my day! Thx again
What size Turkey was used with this? Just trying to figure out the proportions for a 7-10 lb. 🙂
Hi Tammy! The original turkey (pictured) was approximately 14 lbs. I’ve used the brine (without making any recipe adjustments) on turkeys ranging anywhere from about 11 lbs to as big as 18 lbs. The flavor of the turkey for all was fantastic. For a very small 7 lb turkey, try cutting the brine recipe in half. You’ll still get wonderful flavor and juciness! Good luck and Happy Thanksgiving! -Erin
Did you use table salt or kosher salt?
Thank you!
I would recommend using kosher salt. It is ideal for brining. However, if unavailable, regular table salt will work, as I’ve used it numerous times. Enjoy! Erin
Re “Unsweetened, unfiltered” apple cider. Does anyone know if Mussellman’s Fresh Pressed 100% Apple Cider qualifies? Label does not mention either.
Thanks.
Yes, Musselman’s apple cider would be a great choice. Enjoy!
Where do I find the reviews to read? Thanks.
This is year five with this brining recipe and I sit here as my bird sits in the fridge absorbing based in all of its juices. I’ve used it on turkey breasts, and a whole birds and no matter what the choices I have never had a miss in the five years I’ve been using it! What I mean is my birds are so juicy and tender and delicious and everyone loves it… I tell everyone about this recipe and it’s the only way I’ll ever make turkey ever again for the rest of my life! So grateful for this recipe and I hope your reaping the Rewards from all the good vibes you’ve given to so many people… I hope you and all of us have a wonderful holiday surrounded by love and family… FYI – I love apple cider and I’m always found, for me, Honeycrisp apple cider. If you can find it is freaking delicious and has worked best… 💚🧡💛🩷🩵💙🤍💜🖤❤️🩶🦃🦃🦃
This is year five with this brining recipe and I sit here as my bird sits in the fridge absorbing in all of its juices. I’ve used it on turkey breasts, and a whole birds and no matter what the choice is – I have never had a miss in the five years I’ve been using it! What I mean is my birds are so juicy and tender and delicious and everyone loves it… I tell everyone about this recipe!!! It’s the only way I’ll ever make turkey ever again for the rest of my life! So grateful for this recipe and I hope your reaping the rewards from all the good vibes you’ve given to so many people… I hope you and all of us have a wonderful holiday surrounded by love and family… FYI – I love apple cider and I have found, for me, honeycrisp apple cider, if you can find it, is freaking delicious and has worked best… 💚🧡💛🩷🩵💙🤍💜🖤❤️🩶🦃🦃🦃
Love it!! Thanks so much, Kevin!!
I just had my bird in the brine for 24 hours. I didn’t think to ask but do you suggest any seasonings added post rinse/drying the bird before smoking and/orroastin?
Seasoning on top of the skin isn’t really needed. However, to get a nice golden color, maybe drizzle the top with some olive oil. Enjoy!
This apple cider turkey brine sounds fantastic! I can’t wait to try it for Thanksgiving. The combination of spices and the sweetness of the cider should make the turkey so flavorful. Thanks for sharing this recipe!
Wow, this Apple Cider Turkey Brine recipe sounds amazing! I can almost taste the flavors already. I love the idea of using apple cider for a unique twist. Can’t wait to try this for my Thanksgiving turkey! Thank you for sharing such a delicious recipe!
This apple cider turkey brine recipe sounds amazing! I can’t wait to try it for my Thanksgiving dinner. The combination of flavors seems like it will make the turkey so juicy and flavorful. Thanks for sharing this!
This apple cider turkey brine sounds amazing! I love the idea of adding apple cider for a unique flavor. Can’t wait to try it for my Thanksgiving dinner! Thanks for sharing this recipe!
I tried this apple cider turkey brine recipe for Thanksgiving, and it was a total game-changer! The turkey came out so juicy and flavorful—definitely the best I’ve ever made. Thank you for sharing this amazing recipe!
I’ve done this a number of times & you are absolutely right, it’s the best turkey ever! Thanks for the recipe, I had misplaced mine somewhere so I’m super happy I found yours 🙂
Great recipe. I added one TBS of whole allspice berries to kick it up just a little. It’s a keeper!
This apple cider brine sounds fantastic for adding moisture and flavor! I’m particularly interested in the brining time you recommend for a 15-20 lb turkey, as getting that timing just right
Hello! I specify this in both the post and the recipe. 18-24 hours is an ideal brining time for almost all turkey sizes. The meat will be both tender, juicy and flavorful. Enjoy! -Erin